Hexo博客部署到GitHub
本文记录第一次使用Hexo在GitHub上搭建博客,包括需要的环境配置以及搭建过程中遇到的问题。
Node.js的 安装和环境配置
下载安装Nodejs
在系统变量中查看【path】,点击【编辑】,将nodejs的本地安装地址添加到path中
执行命令
node -v查看node版本执行
npm -v查看npm版本在系统环境变量中添加
node_globa的地址:设置环境变量,打开【系统属性】-【高级】-【环境变量】,在
系统变量中新建变量名:
NODE_PATH变量值:
D:\Tools\Nodejs\node_modules
使用指令
npm root -g查看npm包默认安装位置(为了避免以后npm的包都安装在C盘,下面会更改下载位置)在你Node.js的安装位置(与
node_modules文件夹同级目录),新建两个文件夹,node_global和node_cache,并执行以下命令1
2npm config set prefix "D:\Tools\Nodejs\node_global"
npm config set cache "D:\Tools\Nodejs\node_cache"编辑
用户变量(环境变量)的 path,将默认的 C 盘下APPData\Roaming\npm修改成D:\Tools\Nodejs\node_global,点击确定最后别忘了在系统变量
Path里面添加D:\Tools\Nodejs\node_global添加国内npm镜像源
1
npm config set registry https://registry.npm.taobao.org
下载cnpm
1
npm install -g cnpm --registry=https://registry.npm.taobao.org
Git的安装和环境配置
Git官网链接:Git ,除了安装位置,其余全部默认
打开cmd 输入
git验证安装完成安装Git后首先要做的事情是设置你的用户名称和e-mail地址。打开 Git Bush 命令行界面,输入:
1
2git config --global user.name "name" #名称
git config --global user.email "xx@xx.com" #邮箱查询配置:
1
git config --global --list
生成ssh文件夹, 在 Git Bush 输入:
1
ssh-keygen -t rsa
敲击三次回车键,文件目录-C:\Users\用户名.ssh
将ssh文件夹中的公钥( id_rsa.pub)添加到GitHub管理平台中(添加后会收到邮件提示)
在GitHub界面点击:
头像—>settings—>SSH and GPG keys —> New SSH key —>把id_rsa.pub的内容复制到Key文本框—>Add SSH key
在Git Bush 输入:
1
ssh -T git@github.com
新建GitHub仓库,仓库名字必须为 [username].github.io (username必须为你的GitHub名称)
安装Hexo
在本地新建文件夹保存Hexo博客,在Git Bush中打开该目录,然后依次输入如下命令:
1
2
3
4cnpm install -g hexo-cli # 下载hexo脚手架
hexo -v # 验证hexo
hexo init # 初始化
hexo s # 在本地启动hexo
可以在本地打开博客地址看看。
新建md
- 进入博客目录,然后执行
1
hexo n "name"
- 本地打开该md文件编辑内容并保存
本地发布博客
1
2
3hexo clean
hexo g
hexo s
本地浏览器输入 http:\\localhos:4000在本地预览博客
部署到GitHub
首先需要安装发布的插件,在站点目录下执行下面的命令,也就是创建的博客目录下:
1
npm install hexo-deployer-git --save
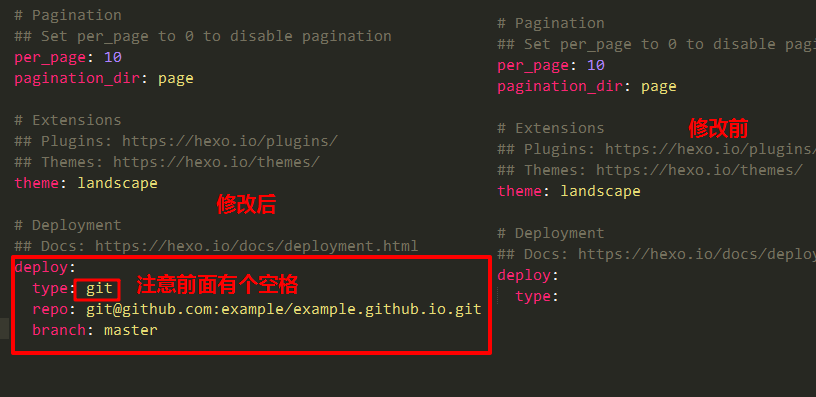
设置
_config.yml文件
repo: GitHub仓库地址
发布到远端
1
hexo d
首次需要输入GitHub账号密码
在浏览器输入仓库地址就能访问
修改博客主题
下载主题
1
git clone https://github.com/jerryc127/hexo-theme-butterfly.git
修改
_config.yml文件1
2
3
4# Extensions
## Plugins: https://hexo.io/plugins/
## Themes: https://hexo.io/themes/
theme: butterfly # 修改主题名称,该名称为你的主题文件夹名称重新发布
1
2
3hexo g
hexo s
hexo d
安装中遇到的问题
Hexo 使用本地图片
更改 _config.yml 配置
1
2
3
4post_asset_folder: true
marked:
prependRoot: true
postAsset: true安装
hexo-renderer-markdown-it和hexo-image-link1
2
3npm uninstall hexo-renderer-marker --save #卸载 marked
npm install hexo-renderer-markdown-it --save #安装markdown-it
npm install hexo-image-link --save # 安装hexo-image-link路径使用解释
Hexo将会在你每一次通过
hexo new [layout] <title>命令创建新文章时自动创建一个同名文件夹。文件名:
./test.md图片路径:
./test/image.jpg当插入图片 image.jpg 到 test.md 中时,typora 的引用路径为 :
1

Hexo 发布后的引用路径为:
1
{% asset_img "span>" "" %}
此时该图片在本地markdown文件中和博客主页中都能正常显示。
Markdown中嵌套网页
- 在markdown文件中加入一下代码:
1 | <iframe |
如果想在hexo中使用本地文件还需要做如下操作
在hexo的配置文件
_config.yml中,做如下修改:1
2
3
4skip_render:
- "games/2048小游戏/2048.html"
- "games/2048小游戏/css/*"
- "games/2048小游戏/js/*"skip_render代表不希望被hexo渲染的页面,希望hexo直接使用。1
2
3"/2048.html" # 表示跳过该文件
"/css/*" # 表示跳过该文件夹下的文件
"/css/**" # 表示跳过该文件夹以及文件夹下的文件夹下的所有文件
Nunjucks Error expected variable end解决办法
问题描述:hexo g,hexo s都报错
1 | COPYFATAL Something's wrong. Maybe you can find the solution here: https://hexo.io/docs/troubleshooting.html |
参见官网链接
Hexo使用Nunjucks渲染帖子(较早的版本使用Swig,它们具有相似的语法)。用{ { } }或{ % % }包装的内容将被解析,并可能导致问题。您可以使用原始标签插件包装敏感内容。
1 | {% raw %} # 在敏感内容前加上这个 |


